
Static Website Hosting on Github - Part 3
Table of Contents
I dream of an uncomplicated life, where with the single ‘push’ I can instigate a complete workflow to do my bidding! In this final part, I will to do just that.
The goals are simple:
- no local compilation
- automatic search index update and upload
- no messing with git submodules
- Source files version controlled in github
The solution will however require custom GitHub actions to complete.
Overall Automated Workflow
As a reminder, for the purposes of these posts, repo1 stores my source files and repo2 stores my built site and has GitHub pages enabled. Our overall workflow across both repo’s will look like this:
First Step - Ignore Compiled Code!
We will start by modifying our .gitignore in the root of repo1, used for our uncompiled website code by adding the following:
# Compiled Website Code
/my-blog-site/public
(Where ‘my-blog-site’ is substituted for the name of the folder your site resides in)
This stops git tracking the default folder where Hugo compiles the website, as we can generate this on demand from the source code. we certainly don’t want to be pulling this down in scenarios where we are using multiple machines.
Our runner on repo1 will build this code on demand, as such we have no reason to store it anywhere other than repo2 for the live version of the site.
Note: If you’re following along from part 2, be sure to delete all references to /public being a git submodule, delete the entire folder and edit the .gitsubmodule file in the root of the repo.
Repo1 Custom Github Action
We will push just the uncomplied files to repo1, so the custom Github Action here will do all the heavy lifting. The Actions steps and specific order are very important, they are as follows:
This is fairly standard fare until we get to Step 4, which is worth mentioning as this step initialises, by way of a clone of the origin, the public folder which contains the build code homed in repo2. Remember in repo1 we ignore this folder in our git config. The new public folder is then ready to receive the new version of the website created when we run Hugo in Step 5 (the order of these two steps is particularly important). Then, with the new site built we can send the new index to algolia website in step 6.
Step 7 links all of this work together and runs the usual git commands from the public sub-folder to push the latest build code from repo1 to repo2, from where it will be deployed by the standard GitHub Pages action as before.
Note that step 7 is complicated by the fact that the runner is targeting an alternate repo, for this we need custom security which is achieved by the use of a PAT token stored as a GitHub secret, the creation of which we cover later in this post.
The Custom Repo1 Action Code
I’ve deliberately left a number of commented out steps that I used in the development phase, which are useful initially to view the folder paths and contents as the pipeline runs. I avoided, where possible, the use of potted marketplace solutions for relatively simple chains of commands, preferring instead the verbosity of running them individually.
I also created a separate search index in algolia for this instance so that I could be sure the automation was working and so that this site would not conflict with my main site, which is still running in parallel on Azure.
name: Upload Data to Algolia Index and Push Latest Site Build to Repo2

on:
  push:
    branches:
      - main

jobs:
  upload_data:
    runs-on: ubuntu-latest
    steps:
      - name: Git Checkout
        uses: actions/checkout@v3
        with:
          submodules: true # Fetch Hugo themes (true OR recursive)
          fetch-depth: 0 # Fetch all history for .GitInfo and .Lastmod

      - name: Setup Node.js
        uses: actions/setup-node@v2
        with:
          node-version: "16"

      - name: Setup Hugo
        uses: peaceiris/actions-hugo@v2
        with:
          hugo-version: "latest"
          extended: true

      # - name: Display the current path and folder content
      #   run: pwd && ls -a
      #   shell: bash

      # - name: Display the website folder content
      #   working-directory: ./website # equivalent of 'cd website'
      #   run: ls -a
      #   shell: bash

      - name: Clone to public folder # do this before hugo run to push up separately
        working-directory: ./website
        run: git clone https://github.com/GITHUBUSERNAME/GITHUBUSERNAME.github.io.git public
        shell: bash

      # - name: Display the current path and content of public folder (before update)
      #   working-directory: ./website
      #   run: pwd && ls ./public
      #   shell: bash

      - name: Run Hugo to Build Latest Site into public folder
        working-directory: ./website
        run: pwd && hugo

      # - name: Display content of public folder (after update).
      #   working-directory: ./website
      #   run: ls -a -all ./public
      #   shell: bash

      - name: Upload Search Data to Algolia
        working-directory: ./website/algolia
        run: |
          npm install
          npm run data-upload -- -c \
            -f ../public/index.json \
            -a DOC7HO0A8P \
            -k ${{ secrets.ALGOLIA_ADMIN_API_KEY }} \
            -n gitdoc

      - name: Push Latest Build to Repo2
        working-directory: ./website/public
        run: |
          git config --global user.email "your@email.com"
          git config --global user.name "yourusername"
          git add .
          git commit -a -m "$(date) automated commit from repo1"
          git push https://GITHUBUSERNAME:${{ secrets.PAT_TOKEN }}@github.com/GITHUBUSERNAME/GITHUBUSERNAME.github.io.git
          rm -rf .git
(Where ‘GITHUBUSERNAME’ is replace with your Github Username is lower case!)
Security Settings
The permission changes needed on either repo are surprisingly minimal, this is by virtue of the fact that the cross-repo actions are done under the security context of your PAT token, as opposed to the native security context of the runner. Hence, default permissions granted to the GITHUB_TOKEN when running workflows is left as read-only.
If you haven’t used a PAT token before, there are a few things worth noting. PAT stands for Personal Access Token, and as such this token is associated with the user account of the person that creates it, essentially it allows automation to impersonate you.
Consequently, wherever possible a PAT token should be created with granular access with the minimum number of rights possible. With this in mind, we will create a fine-grained token, even though at the time of writing this feature is marked as beta.
PAT Token Creation
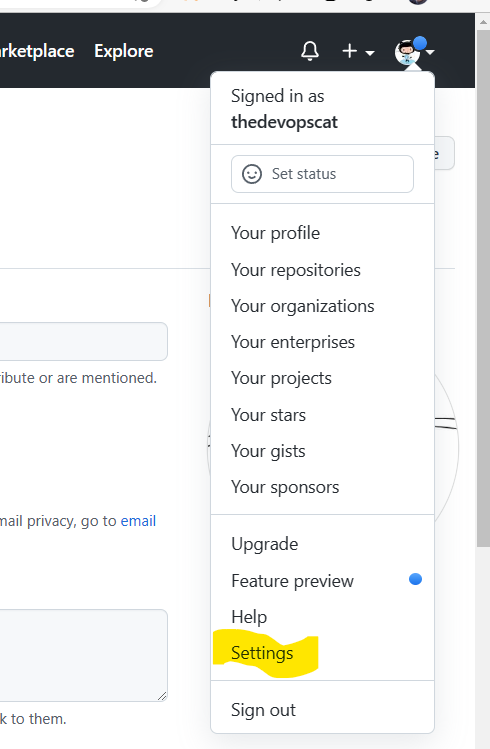
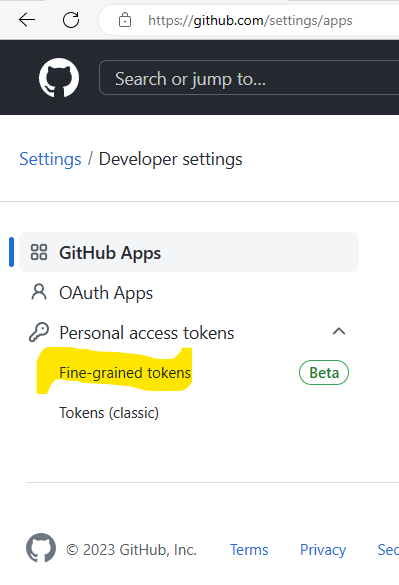
The PAT token is created from the Github user settings (not repo settings) from your GitHub web page, go to settings, then scroll right down to the bottom, and select developer settings from the left-hand menu.
From the developer settings page, select personal access tokens from the left-hand menu, then select fine grained tokens. From here hit the button to generate new token, I would suggest separate tokens for each individual use case, so give this token a meaningful name based on what we will use it for, I called mine ‘repo1 to repo2’ - you could probably think of something better here!
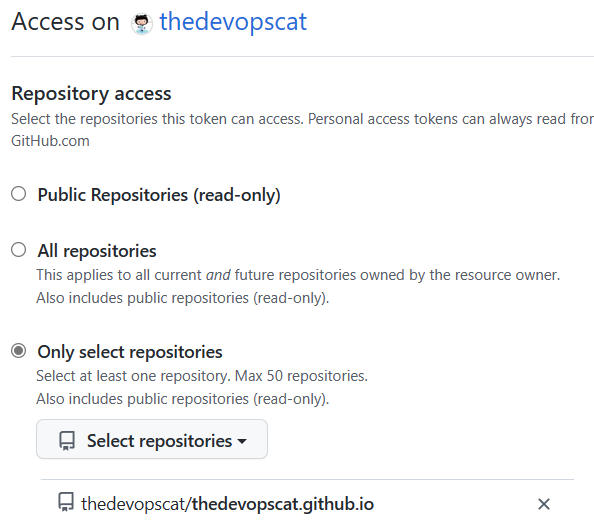
In the repository’s access section select ‘only select repositories’ select the name of your repo2 (USERNAME/GITHUBUSERNAME.github.io)
In terms of permissions, only two are needed, with one being added automatically as a mandatory prerequisite of the other. Scroll down the list and find ‘Contents’ Change the access to read and write, note that metadata read will be marked as mandatory for you.

Don’t forget to save your settings!
Copy the value of your token and save it as a Github Secret for repo1. I named mine PAT_TOKEN, be sure you match the name with the call in the action!
Testing
That’s it, you’re done! You can test both work flows by simply updating your Hugo site content and pushing to repo1, go to the actions tab and drill down to find the run logs should you receive an error.
Final Thoughts
I’m very happy with the end result, I was worried for a moment that the GitHub security requirements might stop me jumping between the two repos and I’d over committed on the art of the possible, but it worked out in the end!
I originally said in part 1 I might try and make this a single repo solution, which in hindsight would probably be easier! However leaving it as two separate repo’s gives you the option of making the first repo private, which I find preferable.
We’ve now reach as close to automation feature parity between the Azure and Github hosting Actions 😎.
I will follow up in my next post with my personal opinions on Azure static web apps vs GitHub Pages now that I’ve tried both solutions in an automated fashion.